Friday, September 28, 2007

More shrinking


Here are all three sizes of the Celtic Pony - 3.25", 1.5" and 7/8". I used the same glaze on all three, and fired them together, but for some reason the smallest one came out a very different shade of green. That's part of the fun of ceramics. You never know exactly what you are going to get until you open the kiln!

I have another neat trick with moldmaking that I want to share, but I need to color-correct the photos first. Hopefully I'll get those up this weekend.

Edit: I forgot to mention. I made another of the smallest size, and placed a tab on the back to make it a button. My only problem was that I didn't mark the mold before I pressed the clay, so I had to guess how to orient the tab. I guessed wrong, so it's oddly oriented relative the the direction of the pony. But it's a really cute button otherwise! And now I have the mold marked for the future.

Tuesday, September 25, 2007

Shipping and Receiving


I've noticed on sites like Etsy and eBay, sellers sometimes specify that their item comes from a "smoke-free, pet-free" home. I am used to seeing the first, but that last one is new to me. So I thought perhaps I should introduce Emmaline, manager of Shipping and Receiving. That's her there, receiving a package. She was given her position due to her enthusiasm for brown trucks and the men who drive them.

I figured a warning might be in order, with all the Pirate Ponies about to arrive at their new homes. We really try to keep Emma from putting too much of herself into her work, but still packages often go out with... well, evidence that this is most certainly not a "pet-free home"! (Don't look closely under the tape and all will be fine...)

Saturday, September 22, 2007

Honey, I shrunk the pony!


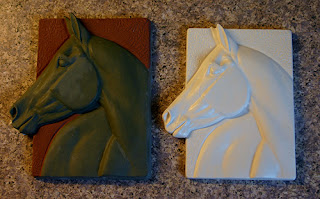
I mentioned earlier that I'd been doing some experiments on the Celtic Pony medallion over the summer. Not only did the poor guy turn pirate, but he got shrunk! Now he's tiny. Really, really tiny! The original medallion (the cream-colored one in the first photo) is around 3 1/4" across. The little guy there is 7/8" across.

There's also an intermediate one between these two which measures 1 5/8", but he needed another coat of glaze so he's not pictured here.

I still need to experiment a bit more. The intermediate piece was slip-cast, and it took the detail beautifully. But then the slip we use is designed to capture really fine detail well. The smallest one, however, was press-molded with moist clay. I need a finer clay than the one I used, because the coarser clay just doesn't pick up the detail as well. There is actually a lot more detail in the mold of the tiny piece than the finished one shows!

My goal with these was to be able to use these guys as jewelry components. Wouldn't a group of the little ones there make a cute bracelet?

Thursday, September 20, 2007

That was fun!

I had a great time celebrating International Talk Like A Pirate Day. Thank you to everyone who participated. I think this will have to be an annual event!

Oh, and we're not done playing with the little Celtic Pony medallion, either. He has another trick I'll show here shortly. (I'm afraid the poor fellow spent much of the summer as a guinea pig for a lot of silly ideas!)

But for now I must go and return the website to its usual purple self, and set up a page for "Dawson" since he'll go to eBay here shortly.

Wednesday, September 19, 2007

YARR!!!


If'n ye be wantin' some fine pirate booty, be addin' yer name to the roster!

(Landlubber translation: The first five people to post their names in the comments section get a Pirate Pony medallion.)

Tuesday, September 18, 2007

Boxes and more boxes!

I have all my goodies boxed up and ready for tomorrow's festivities! So join us on the website in the morning. ARGH!!!

Sunday, September 16, 2007

Another sneak peek


This is "Dawson", from the group of SMB claybody customs I have been working on. He'll be headed to ebay later this week.

Saturday, September 15, 2007

The new edition sneak peek!


I haven't finished his page on the website yet, but I thought I would post a quick picture here. This is our new ceramic edition, Deborah McDermott's Arabian stallion "Al-Hadiye".

(Oh, and the first one was supposed to be a purebred color - dapple grey - but he required an extra firing so this guy gets to be the 'official' first one. I didn't realize until after I got his pictures that the first Finn was a chestnut tovero, too! I am getting too predictable...)

Wednesday, September 12, 2007

A quick picture

I've posted such long rambles these last few days, that I thought I would just add an extra picture and then get back to work in the studio.

The tile mold I posted is a three-part mold; front piece, back piece and the inset piece for the muzzle. The horse molds are, of course, a lot more complicated. Earlier I used a picture from when Joan worked with me on making the mold for Finn (to show how we clay up the original to create the inset pieces). Here are all the pieces for a working Finn mold.


As you can see, it's an eight-piece mold. The new horse that I'll release this month has a nine-piece mold. It's hard to believe that many of the early Pour Horse molds were only three pieces! The desire to recreate some of the popular resin horses in china is really pushing the technology.

Tuesday, September 11, 2007

Back to moldmaking

I apologize for veering off track with my moldmaking posts. I tend to do that!

In the last moldmaking post, I had finished the plaster mold of my in-progress tile. I wanted the mold so that I could make a casting in earthenware, and do some of the fine detail work on the greenware rather than the sculpting clay. I find it difficult to get uniform curves across large areas (like a flank) in the plasteline. The irregularities just shift around. Working in the greenware allows me to sand these areas smooth. I can also carve and detail areas like the background leaf pattern, then soften the effect with a damp brush.


Oh, I should point out something I did wrong with this particular mold.


See the dark stains on the mold? Those happen when slip is poured into the mold before the plaster is completely dry. I was lucky that the mold was still usable after I did this! I hate to admit how many molds I have ruined this way. (Someday I will learn patience...)

But I was twice lucky this time, because the mold was still usable and the original pulled from the mold without any damage. Usually the original is a complete loss. (All the pictures of the original used here were taken after the mold was made.)

So I worked on the greenware. I softened the outine on the cheek area, and added the wrinkles and veins. I aso reworked the background. The original background was created by stamping the plastecine, but I decided I wanted to simplify the design. I also faded the pattern around the outline of the horse, which would allow glaze to pool there and help pop the horse out from the background. Once I had everything the way I wanted, I bisque fired the tile.


Here is the original with the fired bisque copy. As you can see, the fired tile is smaller due to shrinkage. He's also slightly shiny. That's because I used spray varnish to seal the bisque. I'm going to be adding the mane in plastecine, and it will be a lot easier to clean up any excess if the bisque is no longer porous. (He'll also have to sealed for the rubber mold that will be made later.)

So now he's ready for a mane. By waiting until this point to add the mane, I can experiment with the lines and flow without risking the underlying sculpture. I could also make a few rough castings, and try out different approaches. In this picture, my friend Sarah used a rough casting to give me a quick mane sculpting demo during my recent visit to Boise.


I'm afraid the next step for this guy - a rubber master mold - will have to wait, since I'm still debating about his hair-do. But as soon as that part is done, I'll take pictures and show how the rest of the process works.

Monday, September 10, 2007

This is so not my tile press


One of the more difficult aspects of running a home-based business is maintaining a reasonable balance between work life and the rest of your life. Certainly working at home has advantages – no commuting, casual dress, flexible hours. But there is also the challenge to create some kind of boundary between life and work, since the normal boundaries (like commutes, dress codes and set hours) are absent. I suspect this is even more an issue for people like me who are fortunate enough to do what they love for a living. It is too easy to plunge into work, and whatever creative puzzle I have set for myself, and forget that there is a wide world out there beyond my studio walls.

Perhaps that is why I enjoy the fall and the return of each new school year. It imposes some structure to my day, separating out my work and my family life a little more distinctly. And it makes me leave my studio, which I find harder and harder to do as I get older.

So this past weekend I set down my clay and underglazes, and went with my family to the county fair. Our friends the Thompsons had some chickens entered, and we had promised to go cheer them on. I forgot to get their exhibitor number, but I was confident that I could pick the chickens out. The Thompsons keep my horse Sprinkles, so I see the chickens almost every day. Sadly, I was forced to admit that my chicken-picking skills were somewhat lacking - one brown speckled hen looked much like the any of the others! But other than that, we had a grand time. My sons are now old enough to go on the rides alone, so that we merely had to shepherd them from line to line and watch. Since I fall in the category of “risk-adverse”, this was a relief!

Our trip also confirmed my belief that, if you want to find really odd-colored horses, the best places are trail rental facilities and pony rides. For some reason, the oddest horses end up in those venues. And the pony rides at the fair didn’t disappoint, unless you count the fact that I had to leave my malfunctioning camera at home and couldn’t get good pictures. (That’s the other sure way to find an oddity – show up without a camera!) This particular group had a tobiano-and-leopard pintaloosa. The white areas of the tobiano pattern covers other colors and patterns (even the stripes on a zebroid), so it was reasonable to expect that a horse that inherited leopard and tobiano would look like a tobiano with the leopard pattern where the dark patches should have been. But patterns sometime interact in odd ways beyond just overlapping, so until I saw one I could not be sure. Up until this past weekend, all the tobiano pintaloosas I had seen were either varnishes or blankets. But there in the pony ride line-up was a black leopard tobiano pintaloosa, and he looked just as I had expected. (In a line-up of six ponies, there were a red roan, a red silver, two tobianos, an amber champagne and the pintaloosa. It makes one wonder if the craze for unusual colors has tipped the balance of color in the general horse population.) I left trying to memorize the details of his color, just sure it would look great on something shiny!

On Sunday we attended the church picnic and then returned home to work on some household projects. When I heard my husband working in the garage, I was sure he and my sons were building the tile press I had requested a few months ago. The thought gave me renewed energy to finish my own household chores, imagining how fun it would be to experiment with my new toy when I returned to work on Monday. It was only later that I found that it was not a tile press at all, but rather a trebuchet. The guys seemed to think that being able to fling a water balloon up over the tree and onto our neighbor Mike’s house was much more important that my being able to make tiles more efficiently.

So that was how I spent my weekend away from work. I didn’t finish my posts about moldmaking (I will here shortly), but I did return to the studio recharged and ready for what should be a busy week. I didn't get my new tile press, but if the studio is ever under attack, I now have a suitable siege weapon!

Friday, September 7, 2007

A Sad Day

For those that haven't already heard, the well-known model horse artist Judy Renee Pope passed away last night. She leaves behind her lifelong partner, Paula O'Keefe.

Judy was one of the first artists I met in the model horse community. We were active members of what was then the Mini Model Horse Association, and it wasn't long before we struck a friendship. We shared a love of obscure Arabian horse bloodlines and weird horse colors, and I still have the lengthy letters (with side notes in Paula's tiny print) that Judy sent as we speculated on just what historic notations about "particolor" Arabians might have meant. Judy and Paula were the first window I had into a world where others might share what I thought of at the time as my "odd interests".

More than twenty years later, it seems impossible to me that she could be gone.

"Life is short, and there is never enough time for gladdening the hearts of those who travel this way with us. Oh, be swift to love! Make haste to be kind.” - Henri Frederic Amiel

Thursday, September 6, 2007

Still more moldmaking

I thought it might be helpful to post a few more moldmaking pictures. In previous posts, I showed some of the rubber production molds. Those are used to make the plaster molds needed for slipcasting. They are "molds to make molds". This time I will only need one mold, so I am skipping that step and making a plaster mold from the start.

What I want to do is take the tile that I have been working on in Chavant clay, and create a duplicate in greenware. My reason for doing this is two-fold. First I am not sure how I want to finish the piece, so multiple copies will give me the option to work on a number of variations before I settle on a favorite. The other reason is that I prefer working in the greenware during the detailing stage. There is something to be said for being able to smooth out rough spots with a damp brush!

So this is the tile, the first of a planned series on the seasons.


He was sculpted in Chavant clays on top of an old piece of shelving. I use a variety of clays to get the level of firmness I need. As you can see, sometimes that means more than one color of clay! He still needs work (and a mane!), but at this point the basic shapes are where I want them, and I'm ready to pour plaster.

He's not suited to a simple mold, though. The outside edge of his muzzle creates an undercut. If I poured plaster over him now, when I tried to pull the tile I would end up ripping his nose off! So I need to make an inset piece that will come off first. For plaster moldmaking, though, what comes off first gets poured last. We need to fill that area with clay, then, so that a gap remains for the later piece.


You can see some residue from the blue plasticine I used to create the inset piece. (I enhanced it in Photoshop with a dotted line.) Unfortunately, these pictures were taken after the waste mold was made, but here is a more complicated mold with the pieces filled in this way.


(This one was done by my mentor, Joan Berkwitz of Pour Horse. That's why it's neater than mine!)

At this point the tile was boxed up much like the horse above, and the plaster was poured. Once that set and everything was cooled, I banded the shelving and the plaster together and carefully removed the blue clay. That's why I make my pieces out of blue clay - so I can tell where it ends and my original starts! Once the clay is out, I seal the exposed plaster with mold soap and pour the insert.


Next the shelving was pulled off the back (luckily leaving the tile imbedded in the plaster), the exposed plaster is sealed, and the whole thing boxed up once again. Then the lid - our third piece - is poured.

This is the finished mold without the lid.


Here it is with the insert in place, and the lid beside it.


Now I have a waste mold. In my next post I'll explain what I do with it!

Tuesday, September 4, 2007

A Clean Studio!

I am not naturally tidy. I have a habit of allowing chaos to take over my workspace - until I end up spending more time looking for things (usually a clean, flat surface!) than actually working. It's not a good way to run a ceramic studio, though, so part of this weekend was spent restoring my studio to working order.

And since it was finally suitable for company, I took some pictures.


My studio is a converted dining room about 10 x 14. The nice thing about using that room was that it was easy to run water and install a sink. (The downside was that the walls were wainscoted, which made installing cabinets harder.)

The counter beside the sink is where I do most of my moldmaking. It's also where I pour greenware, though not at the same time. In this picture I have greenware to the right drying, and a master mold and my mold boards closer to the sink. I boxed up the master there, but I took it outside to pour the plaster so I didn't risk contaminating the clay. Normally when I am making molds, everything else gets put away and that is all I do for a few days.


These are the two kilns - the larger Skutt 614 and the smaller AIM 88. The molds on the floor to the right of the kilns are drying.


This is my painting and sculpting station. It's usually the messiest part of the room. The white box under the desk is a dorm fridge. I use it to keep my in-progress sculptures cool. I learned the hard way that the kilns warm the room enough to melt Chavant clays!


Since I have a lot of projects underway at the moment, I brought a card table in to create a temporary staging area. Each bisque is sitting on top of a plastic folder of reference materials for its color and pattern. The cabinet beside the table is an old flat file from my graphic design days. The drawers are the perfect height for a single layer of underglaze bottles. They are also a good size to hold extra kiln furniture.

So this is what you'd see if you dropped in to visit - and told me ahead of time. I'm not sure I'm willing to post what it might look like if you arrived without warning!