Sunday, September 29, 2013


We have moved! You can find the Blackberry Lane Pottery blog here:

Blackberry Lane


The new site hosts the archived posts from this site (with larger and brighter photos), as well as the current news from both Blackberry Lane Pottery and Blackberry Lane Press.

Wednesday, October 10, 2012

It's All Swell!


Swellegent, that is! I mentioned the product in a post about the workshop I took with Christi Friesen last month. The Swellegent products are finely-ground metals suspended in a binder. They thin and clean up with water, which make them extremely easy to use, but because they are metal they can be oxidized or given a patina.

I thought they would make nice accepts on giftware, as well as being useful for things like tack hardware and shoes on those ceramic pieces that have them. I ordered the Copper version to test, thinking that it might compliment the crackle glazes on these Clinky Classic Challenge Awards. I added Copper on the cups being held by the horses right over the existing glaze, and then used the patina to darken it. As you can see, it matches the antique copper on the findings perfectly.

The slick surface did make it a little more difficult to handle, and I was glad that I was only adding the metal to a small area. I decided to try another experiment with one of my own Inspire tiles, this time leaving the bare bisque where the metal coating needed to go.


I really liked how the patina made the letters pop from the background, and it was much easier to get a smooth surface using the bare bisque. If leaving an area like the horseshoes on a figure is possible, I think that would be the way to go with this.


Overall I found the product much easier to use than fired-on lustres or even metallic paint. It does take a few days to fully cure, but I found that once it did it was pretty impervious to damage. The company does make a sealant, but even without it - and even on glaze - it did not flake off or scratch. My next test will be with to use the Iron on a horse with shoes, just to see how it holds up to that kind of handling.

For anyone interested, you can order Swellegent from Christi at this link. It comes in Copper, Brass, Iron, and Silver, with each 2 oz. bottle $6.50. One bottle should last quite a while - I did several tiles with nothing more than the residue inside the lid.


Friday, October 5, 2012

Underglazing and linear thinking


One of the most interesting developments in the ceramic community in the last few years has been the emergence of individual glazing styles. In the beginning, there were two main "schools" of glazers. On one side you had those that used techniques developed by Joanie Berkwitz of Pour Horse, who had learned a great deal from her predecessors at Hagen-Renaker. This type of glazing involved airbrushed underglazes. On the other side was the overglaze tradition common in the United Kingdom. Alchemy and Animal Artistry did a lot to popularize this type of coloring among equine collectors. Karen Gerhardt of Wizard's Vale was perhaps the most unique in that she combined the American tradition of airbrushing with British overglazes.

Within each school, the horses often looked quite similar. The medium itself is limited in both palette and technique, and there is a lot about ceramics that discourages experimentation. Glazes are unpredictable at best. Ceramic colorants are not pigments in the traditional sense. They behave a good deal more like chemicals than like paint, which means the rules that govern color mixing do not always apply. (Anyone who makes the mistake of using Cobalt Black on a horse will find that out quite quickly!) Add in the fact that many bisques are valuable, either in terms of rarity or time to create, and it takes a pretty brave soul to try something uncertain.

But even with those obstacles, artists are bending the techniques to suit their preferred ways of working. New ideas are spread and small differences have begun to appear. I suspect that by gathering such a diverse group in Boise, we have probably accelerated that process. This was really evident in the recent post, "A Turning Point" on Sarah Minkiewicz-Breunig's blog.

On one level I found her post very amusing because I could relate to the problem of leaving a project too long. I also have horses that had been dropped mid-stride, and am having to navigate my way out. Even my underglaze mixes are, at the moment, a confusing mess. At some point I had stopped labeling each mix, probably because I could usually remember where I last had the bottle of nose pink, or that the bottle with the "good" flaxen tone had a grey and not a black lid. After a year of writing, those memories are gone. I don't think I realized before just how many mixes (both realistic underglazes and colored art glazes) were some shade of pinkish taupe, but I am quite aware now!


But these were the comments that really struck me:
(Sarah on the subject of spontaneous versus linear creation) 
Even more, my method is fraught with madness. I'm a very chaotic artist who fares bestand creates bestwhen able to metaphorically go back and forth, up and down, in and out, and even sideways when creating a piece. It's very difficult for me to think linearly, to think in terms of fixed procedural steps to accomplish a finished piece. Yet this is what underglazing is all about—starting at Point A and then following a specific sequence to Point Z. Many of the fixed nonnegotiable steps have been a big trip circuit for me because I create so much "in the moment" that I literally cannot see the road ahead of meso I end up stuck in a lot of dead ends. But with the application of overglaze I now have the ability to teleport my creativity anywhere I want it to go; I can glaze as messily as I create!
(Sarah on the need for control over the process) 
But perhaps more pivotal, I'm a painter who prefers a high degree of control in what I want to achieve (insanely so it could be argued). It's that whole OCD thing. I become stressed and hesitant when I feel too much control is relinquished to the media, especially when so much time and energy has already been invested in getting a piece to that point. 
Sarah and I have worked together for years now, and I still remember being quite surprised by the realization that she worked in such a chaotic fashion. I suspect that many who are familiar with the precision with which she captures the equine form, and the level of detail she employs, would find her wide-open approach rather unexpected. I sure did!

This realization also made me more aware that my own approach is very linear. The same requirement to follow a specific sequence from Point A to Point Z that makes it hard for Sarah to work is something that suits me. I am a planner. This is probably best illustrated by these images, which I suppose will reveal the extent of my own form of OCD.

Before firing, the mixes that make this guy's pink nose and his shell-colored feet look the same.


As the notebook in these pictures show, I map out my glazing in writing. I started doing this when I first began because I needed a way to double-check my steps. As Sarah mentioned in a previous post about the Taboo she was glazing, with underglaze you have to plan not only color sequences, but hand-holds. Underglazes are easily damaged by handling, with some more delicate than others. So each project requires an analysis of the order of color. Can the color be masked over? Detailed by hand? Will it "drop under" another color? How hard is it to etch? At the same time, consideration has to be made about what will be available to hold along the way, and what cannot be masked from overspray. Over time, some of this became second nature, but I still write things down. If nothing else, it allows me to recreate (or at least attempt to recreate) past color combinations.

Sarah also mentions the loss of control. That is the paradox of underglazing, and the reason why I suspect it is an unusual artist that truly finds underglazing a joy. You need someone that wants to plan ahead, with the more attention to detail the better. But you also need someone who can, after doing this, let go completely. Once that piece is in the kiln, the element of chance enters. You don't really get to pick the final color. Oddly enough, you can dictate precise details like the outline of a pattern, but things like tone and intensity are not much more than requests. The kiln decides, and in the end the medium is completely unforgiving because by the point you can actually see the final result, everything is sealed under the clear glaze.

The blending of over- and underglaze has the potential to change this. Already Sarah and Joanie have used this to successfully salvage or correct pieces. But I believe that is just the beginning. One thing that overglaze brings to the equation, at least in this new way it is being used, is the elevation of handwork. Any time artists begin using old fashioned-brushes as opposed an airbrush, the opportunity for variation in style goes up. (This is especially true with airbrushed underglaze because of the way ceramic colorants blend.)

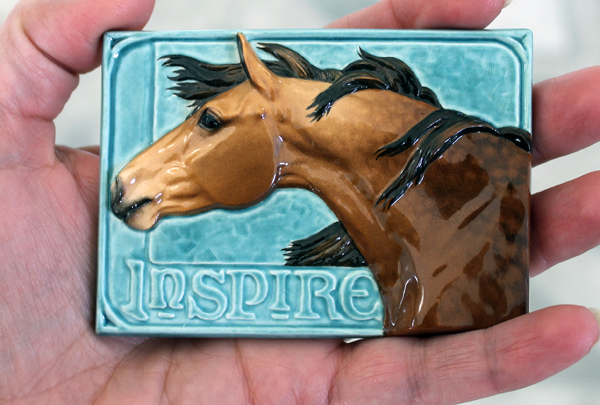
So how will my own work change? Unlike Sarah, I have only ever worked in linear, light-to-dark, unforgiving mediums. As a young artist, it was colored pencil and to a lesser extent, magic markers. Even when I did switch to acrylics, I painted in thin washes of color much like a watercolorist. I think that for an older artist, it is hard to change the basic nature of how you work. So perhaps the trick is to adapt new materials to established approaches. The tile at the top of this post was an experiment. Over the years I have begun adding more and more handpainted details to my glazing, because I am happiest with a medium liner brush. This is most obvious in the mane and tail detailing (the "streaking") on my horses, and is slightly visible on the (very dark) mane on the tile. But almost all the coat detail was done this way, too. I used thin washes of underglaze to punch up the contrast in the darker areas, and to dapple out his coat. This is risky, because it is much harder to gauge intensity with this kind of paint application. It also introduces the possibility of disturbing existing colors or leaving a watermark. But knowing that overglazing can fix things makes taking that risk a little easier, and I believe the specificity of the tonal placement (while still keeping the overall effect soft) is worth it.

I am more cautious and more linear in my thought processes than Sarah, but like her there is something about the energy of colleagues that can make a person a bit braver. The horses currently firing in my kiln represent some of the next steps in this process. It is an exciting time to be a ceramic artist!

Friday, September 28, 2012

Synergy!


I am a big believer in synergy - the idea that contributions from a variety of sources can produce something that is greater than each of the component parts. If there is a word that embodies the "mudhen" culture, it is synergy. I sometimes get feedback from people surprised that I openly share the details of how things are made here on the blog, but really this is only a reflection of the larger professional community of which I am part. You never know what small insight on your part might spark a still better idea from a colleague, which in turn might lead another to yet more advances.

Thanks to the internet and social media, there is a pretty steady stream of shop talk between most of the ceramic producers. Even so, there is nothing like an in-person gathering. For many years several of us gathered in the spring for "Mayhem", but for the last few years life has gotten in the way for all of us. We decided that this needed to change in 2012, and plans were made to gather once more in Boise.

This year the usual suspects - Sarah Minkiewicz-Breunig and her husband Chris Breunig, Joanie Berkwitz, and Lynn Fraley - were joined by a new addition. That was Karen Gerhardt of Wizard's Vale. Karen is an overglaze artist, so her methods are significantly different from those used by underglazers, but more on that in a bit! For the moment the important part was that Karen finally gave our gathering a name - Mudhenge. It had a much better ring to it than Not-Really-In-May-Mayhem!

Here we are setting up shop at our temporary work stations in Sarah's studio
Sarah had somehow managed to transform her studio into five separate work stations, complete with personalized gift baskets. Exchanging small gifts is a bit of a tradition at our gatherings. My personal favorite were a pair of Loza Goats that Joanie glazed as "Heterozygoats" for me. It's hard to go wrong with friends who understand your genetics geek puns.

"Heterozygoats - Allele uneven"
Our original plan was to all arrive over the weekend so that we could attend Art in the Park in Boise. Unfortunately, I would end up sabotaging that idea. 

Quite a few years ago I attended Lynn Fraley's Wire to Winny seminar. It was my first trip to Boise, and only one of a handful of trips I had ever made out West. Within a day of my arrival, I was terribly sick, and by the second evening I was admitted to the hospital suffering from severe dehydration. At the time I chalked it up to the long flight and the drier climate, and perhaps the stress of having lost my twin a few months prior. It was not an issue again, at least not to that extent, until last summer when my family traveled to Germany. 

Since touring the world, sampling the quality of the different Emergency Rooms, was not my idea of a great new hobby, I had a lot of motivation to stay hydrated. Besides, I had already tested the healthcare system in Idaho. Soon after arriving in Boise, I texted my husband to reassure him that I was entirely waterlogged, and that there was "No ER for me!" 

My special collection of Boise Emergency Room wristbands
By the next morning, I was not feeling well so I encouraged the gals to go to Art in the Park without me. By lunch, I was sending my husband a text informing him that I was on my way to the ER. I am happy to report that the staff there are just as friendly as they were the first time, but I am left with a mystery. Dehydration is obviously the end result, but not the original cause. Needless to say, I am hoping my own doctor can solve the problem, because Boise is a long drive from Charlotte!

Sarah, Chris and I did manage to go back to Art in the Park the next day. I love craft shows, especially when they are juried. I have never had the kind - or quantity - of product that was suited to selling at shows, but I do find the way other craftspeople market themselves fascinating. It was interesting to see how many artists had promotional materials (which were more diverse than just business cards, thanks to companies like Vistaprint and Moo) that tied into social media sites like Facebook or online craft sites like Etsy. Because the show did not allow photos, I took extensive notes about products and displays. I was particularly taken with the combination of ceramic tile components and mosaics done by Rocky Canyon Tileworks

A lot of promotional materials had the QR Codes for cell phones
Probably my favorite booth was the one for Masak Pottery. They make personalized stoneware plates and trays. The folks at the booth allowed me to take a forbidden photo so that I could give them the color scheme when I ordered. Alan and I are planning to renew our marriage vows for our 20th anniversary, and I wanted to have a pottery chalice and paten made for the service. I loved this particular design and the color scheme. 

The Masak pieces reminded me how much I would like to work some more with text on tiles. I loved the informal, organic quality of the lettering, and how well it worked with their various designs. 

Masak Pottery personalized plate
After a partial day at the show and a quiet evening, I was back on track for the week. Monday was to be our first real work day, and I was ready. 

In the past, our gatherings have focused on a specific project. Usually that meant taking copies of a not-yet-released (in ceramic at least) sculpture and glazing them. This was done with Stormwatch, Brownie, Pixie, Vixen and Imp. With each gathering, though, we've become more technique-focused, rather than project-focused. (The focus on eating, I am happy to report, has not changed at all.)

So instead of a project, we were looking at targeted exchanges of ideas. Monday was for Joanie to share her methods for getting soft color transitions in underglaze on textured sculptures. Because the usual methods for working in underglaze involve latex masking and etching, we tend to get crisp edges. The fact that you can only work light-to-dark further stymies attempts to get softer outlines. Joan had been using a combination of freehand airbrushing and erasing (which is how we ordinarily get dapples) for this, and it was one of the things I was most keen to see.

I have to admit, though, that I was intimidated. I suffer from perfectionism, which I usually prefer to call a preference for meticulous execution. In actual practice, that "meticulous" execution can easily slide into no execution at all. If I am not careful, my desire to get things just right can turn into a road block where I get nothing done - or at least nothing finished. When I am working consistently, this is not usually a problem. But I have been away from the studio, and underglazing in particular, for the better part of a year. This is when paralyzing perfectionism tends to take over.

All the factors that make that problem worse were there. A new (valuable!) mold. Unfamiliar tools and environment. And - the horror! - someone was going to ask me to give up my masking. Airbrushing is my weakest skill set, so I tend to use masking and handpainting as compensating props. Still, peer pressure can be a good thing. A few warning glares and Joanie convinced me to put the bottle of latex down. I wasn't going to learn her approach if I retreated back to what I knew. So it was a few days of no-safety-net glazing, but I was pleased with the results. I gave him to Sarah, who named him Mudhengie in honor of our gathering. I like that my leap-of-faith foal lives with Sarah, who is about as incautious in her approach to work as I am cautious! 

Joanie's Oliver, Chutney, and mine, Mudhengie
In the evenings of the days spent working on underglazing, I presented two of my more recent horse color seminars. Because it was more informal than my usual venues, I opened the floor to comments and questions as we went along. Normally I have a strict rule about leaving questions until the end, since it is the only way to control my own meandering style. I was quite tickled with how well the back-and-forth worked in a small group setting like that. That kind of real time feedback is a very valuable thing, especially as I look to the future volumes of Equine Tapestry.

With underglazing and horse color behind us, it was time for the part we were all most keen about. As I mentioned before, Karen uses a different type of system from the rest of us. Our color goes on first, under the glaze, which is applied at the end. Karen is a china painter, so her glaze goes on first and then the color is applied over it. We were all eager to see how this approach could give us more "tools in the toolbox" for our work. Sarah's recent Facebook images and blog post tell this story better than I could. Suffice it to say that Karen is a wonderful instructor, and Lynn (who offered her studio for this part of the week) is an incredibly gracious hostess. 

Normally these must be ordered in large quantities
Only a bunch of ceramic artists would practice on a rare Maureen Love Lippitt. (Joanie once told me that if you do this long enough, you get over worrying about their value and fragility, and it is true.) I should probably mention that china paints wash right off if they are not fired. This poor guy did not stay like this, and was no worse for wear despite all of us using him as a glazing guinea pig. Karen has been documenting his real coloring on her studio page here

Even I cannot come up with an plausible explanation for this color...
Here are Sarah and Lynn watching Karen work. All of us were sharing pictures over Facebook throughout the week, thanks to our smart phones. I am not sure if we posted more horses, or more food. I think it was food.

The quality of images had me coveting Sarah's iPhone
Our last few days were spent learning how Sarah was using porcelain slip, particularly how she was using it for her claybody custom Reflective plaques. Because I do a fair bit of bas relief, particularly jewelry, this was of special interest. It was also what I dove into when I returned home, so I will probably explore the topic in more detail in future posts.

There was something vaguely horrifying about seeing Sarah remove this guy's eye
Sarah also cast a Pour Horse Limerick in the porcelain slip. Porcelain behaves differently than the low-fire earthenware we normally use. Conventional wisdom says that this will not work, at least not without extensive propping in the kiln - which is not something the members of our group have experienced. Still, does this look like someone who follows conventional wisdom?


So I came home inspired, full of new ideas and perhaps a little less cautious. It doesn't get better than that!

Wednesday, September 26, 2012

Adapting


Before I talk about my trip to Boise, I wanted to mention one of the tools I took with me. In a post a few years ago, I mentioned the trouble I was encountering with my near vision. At the time, I wondered how much longer I would be able to work on small-scale models. The sad truth was that in the year that followed, painting only got more difficult. Even with corrective lenses, I found that by the end of the day my ability to do close work was non-existent. My unintended hiatus from the studio may have been  due to the realization that the book would never be completed without a period of single-minded focus, but my growing frustration with my vision - and the resulting headaches - certainly played their part.

What I did not expect was just how bad that vision had deteriorated while I was away. Working on the computer, where I can enlarge images to fill my 27" Macintosh monitor, hid the problem. When I returned to the studio, it was clear that even with reading glasses, the situation was not remotely workable. Not only were they not strong enough, the magnification was wrong for the distance I tended to hold things in order to paint them (which is quite a bit closer than people typically hold a book). I also needed them all the time, not just for the smallest details. That meant that I didn't take them off, so when I looked at my desk for the next color or a specific tool, this is what I saw.

Where is that bottle of Smoke Gray again?
I already wear progressive bifocals with a far and a mid-range correction. But for work, what I needed was the correct magnification for really close work, plus a mid-range so I could glance over at the tools on my desk, and a distance so that I could see the pressure reading on the compressor or the temperature reading on the kiln (or know which of my children was at the door to interrupt me). Most progressives change from far to near starting at the top and going to the bottom. I needed the order changed so that the closest was in the central part of the lens, since that was their primary function.

Thankfully, my optometrist was willing to work with me to develop a specialized lens for studio work. I would encourage anyone with age-related vision issues to do this. In my case, I took my work and some tools and had her watch how I work. She then measured distances, and came up with a design that would work. She cautioned that we might have to make a few attempts to get the correction placement and the transitions just right, but so far it seems the lab got them right with the first try.

Like any progressive lens, they have taken a bit of time to adjust. I realize now that I really should have started the process much earlier. The glasses (which are pictured at the top with Taboo) arrived the day before I attended Christi's workshop. Struggling with a completely different lens configuration at a workshop was not the smartest thing I ever did! And I was only marginally better when I left the next day for Boise. But little by little, I find my productivity returning now that I am losing my fear that what I think I see as I paint may be quite different from reality!

Wednesday, September 19, 2012

A Bit of Whimsy


When I made plans to attend our annual ceramic artist gathering in Boise, I did not realize that my departing flight would fall the day after I was already scheduled to attend a bead making class with polymer clay artist Christi Friesen


I have always enjoyed Christi's fanciful beads, and am an even bigger fan of her colorful how-to books. Like my fellow ceramists, Christi a big believer in sharing ideas. She has a wonderful, conversational style in her books that is very appealing. When I found that she would be offering classes at The Beaded Frog in nearby Greenville, SC, and that one of those classes would be making a pegasus bead, I knew I had to sign up.


I have given Christi's books (and beads) as gifts in the past. I think all of us working in the realistic art field benefit from loosening up and getting a little silly from time to time. It is a lot easier to take risks with something that is playful from the start. And Christi was nothing if not playful, as her pose for my picture (above) suggests. I also found her flexible, open-ended style of teaching her students to be very inspiring. 


So instead of packing last minute items for Boise, I was making the pudgy palomino pegasus pictured at the top of this post. He was done in Christi's style, since he was done by her instructions, but I'd love to explore a more whimsical style with some of my giftware in the future. And as with most ventures into unrelated artistic fields, I found quite a few things to take home for my own work. The lovely tools in the picture above are Christi's design, and will fill a niche in my own studio. (You can see her full line and order them here. ) She also offers a product called Swellegant that is a metallic coating that can be painted on a surface and then given a patina. It looks like it might work better than fired lusters for things like bits and shoes. And finally, she was willing to tell me how she managed to publish such high-quality full color books for such a reasonable price.

It made preparation for my trip a little hectic, but the class was the perfect start to a week spent in the company of other creative people!


Wednesday, September 5, 2012

An Unintended Hiatus


I knew I had neglected my studio blog while working on my horse color book, but I was genuinely shocked to realize that it had been more than a year since a post was made here. It is, however, a pretty telling indicator of how that particular project moved in and took over my creative life. As an avid reader who really does read the front matter (introductions, acknowledgements) in books, I was aware that writers almost universally mention the sacrifices of their friends and family while they were absorbed in the work. Now I understand why!

The Equine Tapestry was supposed to be a small project - something to fill my time while recovering from foot surgery. What I had in mind was a quick reference guide that equine artists, model horse showers and judges could use to verify the presence (or absence) of colors or patterns in each of the different breeds. I thought that I could give a quick description of the different colors, then a paragraph for each breed. But the world of horse color is changing. New discoveries are outpacing the normal publishing schedules for books. I could not rely on readers being able to find more information to go with a "quick description", because much of the information could only be found in peer reviewed journals. It is also true that it was just too tempting to begin adding images, which meant a more detailed explanation.

And that was all before I got to the breeds themselves. Keeping the stories to a few paragraphs seemed nearly impossible. What's more, understanding color in the breeds was too closely tied to how the different stud books were structured. Telling someone that there was a buckskin Shire, and even providing pictures showing her unmistakable color, was not enough. Readers needed to understand why she was a perfectly legitimate - if entirely unexpected - entry in the stud book. Paragraphs became chapters, and before I knew it I had close to 900 pages of manuscript in a book that was not even close to finished.

I decided to split the single book into three, and then eventually four, volumes. The project also changed in scope, so that I was not just writing for people within the equine collectibles industry. I was writing the books that I wished existed. It was - and still is - a labor of love. I should have seen the potential for it to crowd out all but the most essential things in my life. (My friends and family might argue that sometimes even those got short-changed!)

But the first volume went to press in July. At 424 pages, it covers all the (as yet!) known colors and patterns, and then begins with the draft and coaching breeds. In addition to hundreds of photos (many historical images of rare colors), the project included creating 81 illustrations for the various pattern charts.


The book has been far more successful than I ever imagined. In the first week, it went up to the #5 best-selling horse book on Amazon, despite the fact that the majority of the copies were sold directly (through my site here) and were not included in the count. It was also the #1 new release in its category that week. Within two months, it has already exceeded the typical press run of a specialty horse book. The companion blog, Equine Tapestry, that was launched a little over a year ago gets thousands of hits from all over the world. What is even more surprising is that the blog reaches people all over the world, and that has resulted in a lot of new information on some unusual colors. (You can read more about the effect I called Belton and reverse dapple roaning by following the links.)

Obviously with three more books to finish, the project is not really finished. But it is time to return to the studio and the many projects I left here. I suspect that taking a break from all-day writing (and illustrating and editing) will give me better perspective for the next volume, which will cover the pony and small horse breeds. 

I do know that focusing on the details of the various colors and patterns has already given me a new perspective that I suspect will benefit the work that will come from the studio. So stay tuned - colorful, shiny things are (once again!) in the works...